Friday, December 20, 2013

3rd marking period

21: google sketch


for this one we had to start with the basics and we did all the things that we will do with Google sketch,. we learned how to do 3d things and we learned how to make tingles squares and circles. and we learned how to use the pencil tool.
********************************************************************************
22-1 
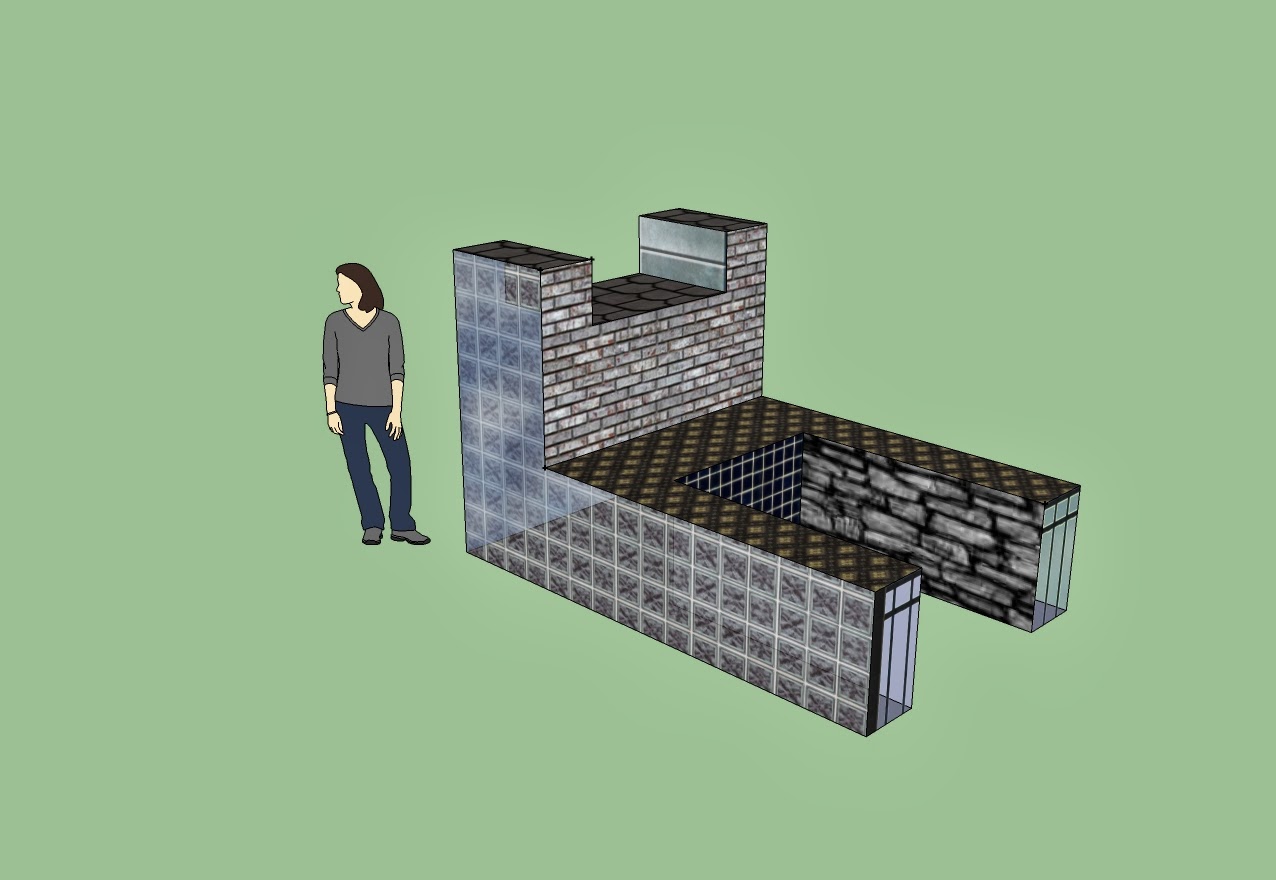
 for this one we had to make a big box and we had to cut it by using the 3d effect but before that we had to use the tap measure and measure the parts we want to cut and create. it had to be 8 by 5 and we had to cut out 1 feet some others were 2 feets and in the end we had to use the paint tool to color it.http://tzs11.blogspot.com/
********************************************************************************
22-2
 the length was 8 by a height of 5 and width of 5 we had to make a big box based on those measures and then we had to cut them in a specific way in a specific measure and we use the 3d tool to move them all the way to the end to our desired location or we can cut it all off if we were needed to do so. then we had to color all the sides in our own creative way.http://tzs11.blogspot.com/
*******************************************************************************
22-3

 the length was 9 by a height of 6 and width of 4 
*********************************************************************************
22-4
 the length was 7 by a height of 6 and width of 4 
*********************************************************************************
22-5
 the length was 8 by a height of 5 and width of 5 
********************************************************************************
22-6
 the length was 8 by a height of 6 and width of 5 
*********************************************************************************
22-7
 the length was 8 by a height of 6 and width of 5 
*********************************************************************************
22-8
 the length was 9 by a height of 6 and width of 5 
*********************************************************************************
22-9

 the length was 9 by a height of 6 and width of 4
*********************************************************************************
22-10
 the length was 11 by a height of 6 and width of 3 
*********************************************************************************
22-11
 the length was 8 by a height of 6 and width of 5
*********************************************************************************
22-12
 the length was 9 by a height of 6 and width of 4
*********************************************************************************
quiz
 the length was 9 by a height of 6 and width of 5 for this one we had to put the circle at a certin spot and we had to erase the lines and we had to push it out and for the corner we had to delete the outside lines for it to look like a circle corner.
*********************************************************************************
23- ginger bread house
we had to make a house coping the exact same form for the picture.
*********************************************************************************
24- 3d gingerbread house
for this one we had to make 2 layers one for house and one for background then we had to go to the layers and uncheck the red and green.
*********************************************************************************
25- powerbutton 
first we made a circle. then we got a power button and i wanted to make it a green color so i made it green and then i went to animation and i set the timer on the on and off switch for the colores. lasty it looked great.
#25. what is GIF?
gif is basically something that replaces another like for an example that is what animation is it replaces the original with the color as time goes by every 2 seconds but it does it constantly.
How does animation works?
animation is  basically what we did in the powerbutton. we made the button turn on and off by itself through frames where we separate the time of it turning on and off i had about i think 8 frames and each one had a 2 second breach.
*********************************************************************************
26- test showcase
www.photoshop-plus.co.uk/2011/09/21/learn-how-to-create-your-very-own-showcase-room/#more-648
so first we had to make a big rectangle. then we had to cut it out into different parts like the ceiling floor sides and middle. and then we had to follow the gradient and the way he has his blending options are. then when the background and sides were like that we had to make the lights so we made two circles and we did again the blending options then we duplicated them three times. then we made the lights in the middle by creating whatever shape they were they were 3 circles 3 ovales and 3 squarish shape don't know what it is. then we had to lower the opacity and we went to blur and gaussian blur to change the view of it and for the circle it was 10 and the other two was 25. then we had to put the pictures in but made sure we cut out the  background and kind of give them a little shadow at the bottom.
*********************************************************************************
27- final 
in this one we had to make a proshure about our selfes and our school worm. on the top i have on the right the school and my schedual. in the middle i have the way i get to school and a little about me. on the left i have what i do in geometry and what i do in spanish. on the bottom left i have about my history class and my english class. and in the middle i have about what i do in gym, lab, and chemistry. and last i have about what i do in lunch and what i do in multimedia.
*********************************************************************************
EVALUATION.
in this class i learned many things i wanted to learn from along time ago. i learned how to use photoshop and what i can do with it. i now know that i can do many things with photoshop such as cut out or do many amazing things. second i learned how to use google sketch up. we did 3d stuff in it and that was my favorite of them all really. in illistrator we created things and my favorite really was the phone that was amazing. i showed many of my family and friends. in publisher we used it to create things such as bussnies cards and the last project. we created things that will help other people know about us. in powerpoint we use it to make many presentaions and i used it for 3 of my presentations this year. over all i really enjoyed this class i will miss it the most i wish i had it for the rest of the year. and the next students are lucky. 


Thursday, October 17, 2013

second marking period

11: Flyer 
i had make my own flyer and the title was noche de ciencias. i used the same thing we had to do in assignment 8 which was the background has to be shown through the words. so i put in the important information and i made sure that the pictures in the background were showing through the title and i used a logo for the school and for city collage. and i just kind of had to make it my own style and thats what i came up with.

*************************************************************************
12: Texture via Layers
We had to do the same thing we did for #10 we took a suit and we took a pattern and we had to take the pattern and put it on the suit. first we had to use the magnetic lasso tool to go around the location of the part we want covered with the pattern. then we had to take the pattern and adjust it on the suit and make sure that it is what we want. then we had to take the suit and the pattern and put it on the side.
*************************************************************************

13: change one thing poster

In this project we had to do the same thing we did in project 12 we had to get a healthy food and a healthy food. and we had to do what food bank did and that is to inspire teens to eat healthy for my project i had a hot dog and exchanged the hod dog with a cucumber.

*********************************************************************************

                                                                 14: Jack O'Lantern


                  For this project we had to do something for Halloween and the thing we had to do is pretend that we had cut open a pumpkin and make it like visual and as real as we can. first i had my pumpkin and used the magnetic lasso tool to cut out the background of the pumpkin. then we had to color it in the way we want it. then we had to use the pen tool to color our face. then we had to use the magnetic lasso tool again to go around the face we have. then we had to double click the layer and follow the same thing as the guide in http://www.adobetutorialz.com/articles/3011/1/Happy-Halloween-Ideas.

*********************************************************************************

  15.A creating a painted effect using displacement
For this one we had to like paint a flag on bricks through Photoshop. we followed the steps to the website that i will have a link of at the end. we had to put the flag layer over the brick layer. then we had to create a copy of the brick layer. then we had to make the flag layer hard light instead of normal. after that we had to save it. then we had to go to the flag layer and go to filter-distort-displace. and we had to make sure that they are all on 6 then open the saved one onto this one and th  ere you go.

*********************************************************************************

15.B painted selfie 
 For the painted selfie you must do the same exact things as the painted brick wall #15A. all you got to do is at the end you must erase the flag that is on the hair wall neck and all that.

*********************************************************************************

                                                       16: Motion Blurred Via Smart Filter
for this we had to make believe or actually make something look like it was moving through Photoshop.  first we had to open it as a smart filter. then we had to set it to 5 to make it blurry enough. then we had to take the eraser and go over the train with it to make the train not blurry and after we did that we were done. the link is http://www.tutorialboard.net/understanding-and-using-smart-filters-in-photoshop-for-dynamic-adjustments/

*********************************************************************************

17: Masking an area for changing eye color
i was sad that i couldn't use my cat but when i saw this cat i was happy because it look just like him eyes ears nose and color. we had to first highlight the eyes then we had to use the inverse to delete the layer around the whole thing and we then open filter-fill and then we chose the color we want for the eyes and make sure the opacity low enough that you can see the color and the eyeballs. the link is   http://www.tutorialboard.net/using-a-quick-mask-to-make-a-detailed-selection/

*********************************************************************************

18: Soft filter for a better skin tone
we had to get a picture of an old lady and we had to make it bright. first we had to open it normally and convert it to smart object. then we had to set it at 5 and we had to put it as a screen layer not a normal. when it lights up we had to take the brush and select the thumbnail thing to delete the light on the important parts light eyes hair and background. the link is  http://www.tutorialboard.net/add-a-soft-focus-effect-to-make-a-portrait-glow/
********************************************************************************
19: flash drive
so the first thing we had to do was open illustrator then i had to make a rectangle which is the blue side of the flash drive. then i had to change the gradient to what they had and i chose the color blue you can chose any other color. then i had to make the two black layers onto of the blue flash drive. and then i had to make there different squares in sizes. then i had to put them on top of each other and i had to make the inner flash drive curve and write my name and i chose the size of it 64 gb. the link is http://www.tutorialboard.net/create-realistic-pendriveas-adobe-illustrator/
*********************************************************************************

20:test phone
..
-
we had to do a lot of stuff. first we had to make a rectangle with a specific size and do many paths and change each ones linear gradient. then we had to make a rectangle with a specific size and crate two paths with each their own gradient. then make a smaller rectangle in the middle of the box which is orange. then we had to make the circular thing under the orange rectangle then we made many paths then we coped it over.
after that we had to write our names and the schools name. then we had to make a rectangular for the controls of the phone then make another one on it and group them then cut off the things we don't have. then we had to make the circle in the middle and then we had to use the font we were instructed to use to make the symbols. then we had to make the keys thing by make a circle with a specific size then we had to make many paths on it and then we had to add the numbers and letters. then we had to make a circle with a size on the top and make another smaller one on it then make 3 smaller circles. that was it the link ishttp://vector.tutsplus.com/tutorials/illustration/how-to-create-a-stylish-wireless-phone/ 
*****************************************************************